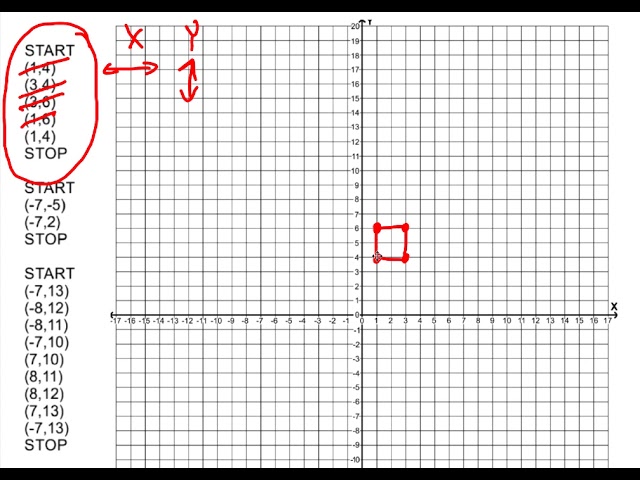
How To Center Worksheet Horizontally In Excel


How To Center Worksheet Horizontally In Excel

Centering a worksheet horizontally in Microsoft Excel involves adjusting the alignment of the content within the worksheet to ensure that it is evenly distributed across the available space. To achieve this, select the worksheet or specific cells you want to center, then navigate to the ‘Page Layout’ tab in the Excel ribbon. Within the ‘Alignment’ group, locate the ‘Horizontal’ drop-down menu and select the ‘Center’ option. This action will distribute the content horizontally, ensuring it is centered within the selected area.Centering worksheets horizontally is important for enhancing the visual appeal and professionalism of your spreadsheets. It creates a balanced and organized layout, making it easier for users to read and interpret the data effectively. Additionally, centering content horizontally can facilitate printing by ensuring that the information is appropriately positioned on the page.

In earlier versions of Microsoft Excel, the process of centering a worksheet horizontally was slightly different. Users had to manually adjust the column widths or use the ‘Format’ menu to access the alignment options. However, with the introduction of the ‘Page Layout’ tab in later versions, the process became more streamlined and intuitive.

How to Center Worksheet Horizontally in Excel

Centering your worksheet horizontally in Excel is an important skill for creating professional-looking and easy-to-read spreadsheets. Here are three key aspects to consider:

  • Alignment: The “Center” alignment option in the “Alignment” group on the “Page Layout” tab is used to center the content of cells horizontally within the selected range.
  • Selection: You can center the entire worksheet by selecting all cells (using the keyboard shortcut Ctrl+A) before applying the “Center” alignment. Alternatively, you can select specific cells or ranges to center their content.
  • Uniformity: Centering worksheets horizontally creates a consistent and organized layout, making it easier for users to navigate and understand the data.

These aspects work together to ensure that your worksheet content is evenly distributed and visually appealing. By aligning cells horizontally, you improve the readability and presentation of your spreadsheets, making them more effective for communication and analysis.

Alignment

In the context of “how to center worksheet horizontally in Excel,” understanding alignment is crucial. Alignment refers to the horizontal distribution of content within cells, and the “Center” alignment option is specifically used to center the content horizontally within the selected range of cells. This alignment option is essential for creating a visually appealing and organized worksheet.

Consider a scenario where you have a worksheet with data that is left-aligned by default. Centering the content horizontally using the “Center” alignment option will ensure that the data is evenly distributed across the cells, creating a more balanced and professional-looking appearance. This alignment also makes it easier for users to read and interpret the data, as the content is centered within the cells, providing a clear and consistent visual presentation.

Moreover, using the “Center” alignment option consistently throughout your worksheet promotes uniformity and enhances the overall readability of the spreadsheet. By aligning cells horizontally, you create a cohesive and structured layout that guides the reader’s eye across the data, making it easier to follow and understand.

Selection

Understanding the concept of “Selection” is pivotal in mastering the skill of centering a worksheet horizontally in Microsoft Excel. “Selection” refers to the process of choosing specific cells or ranges of cells within your worksheet. Depending on your requirements, you can choose to center the entire worksheet or specific portions of it.

To center the entire worksheet horizontally, you can simply select all cells using the keyboard shortcut Ctrl+A. This action will highlight all cells on the worksheet, indicating that they are selected. Once all cells are selected, you can apply the “Center” alignment option from the “Alignment” group on the “Page Layout” tab. This will center the content of all cells horizontally across the worksheet, creating a balanced and visually appealing layout.

Alternatively, you may want to center only specific cells or ranges of cells within your worksheet. In such cases, you can use your mouse to manually select the desired cells or ranges. Once the selection is made, you can apply the “Center” alignment option to center the content of those specific cells or ranges horizontally. This approach allows for more flexibility and customization in aligning your worksheet content.

Uniformity

Exploring the connection between uniformity and centering worksheets horizontally in Excel reveals several key facets that contribute to the overall effectiveness of this practice:

  • Visual Consistency: Centering worksheets horizontally creates a uniform and visually consistent layout, where the content is evenly distributed across the worksheet. This alignment ensures that all data elements are presented in a structured and organized manner, enhancing the overall readability and appeal of the spreadsheet.
  • Improved Navigation: A horizontally centered worksheet allows users to navigate through the data more efficiently. By aligning the content consistently, it becomes easier to visually scan and locate specific information, reducing the time and effort required to extract insights from the spreadsheet.
  • Enhanced Comprehension: The consistent alignment of content in a horizontally centered worksheet facilitates better comprehension of the data. When data is presented in a uniform manner, users can more easily grasp the relationships between different elements and draw meaningful conclusions.
  • Professional Presentation: Centering worksheets horizontally contributes to a professional and polished presentation. It demonstrates attention to detail and adherence to best practices, which can be particularly important in business or academic settings where the presentation of data plays a crucial role in conveying information effectively.

In summary, uniformity in centering worksheets horizontally in Excel is essential for creating visually appealing, easy-to-navigate, and readily comprehensible spreadsheets. This practice enhances the user experience and promotes effective communication of data.

Frequently Asked Questions About Centering Worksheets Horizontally in Excel

This section addresses some common questions and misconceptions related to centering worksheets horizontally in Microsoft Excel, providing clear and concise answers to enhance your understanding of this useful technique.

Question 1: Why is it important to center worksheets horizontally?

Centering worksheets horizontally creates a visually balanced and organized layout, making your spreadsheets easier to read and navigate. It ensures that the data is evenly distributed across the worksheet, eliminating any uneven spacing that can hinder readability and comprehension.

Question 2: How do I center an entire worksheet horizontally?

To center the entire worksheet horizontally, select all cells by pressing Ctrl+A on your keyboard. Then, navigate to the ‘Page Layout’ tab and locate the ‘Alignment’ group. In the ‘Horizontal’ drop-down menu, choose the ‘Center’ alignment option. This will center the content of all cells horizontally across the worksheet.

Question 3: Can I center only specific cells or ranges horizontally?

Yes, you can center specific cells or ranges horizontally. Select the desired cells or ranges, then follow the same steps as mentioned in Question 2 to apply the ‘Center’ alignment option. This allows you to customize the alignment of specific sections of your worksheet.

Question 4: What are the benefits of centering worksheets horizontally?

Centering worksheets horizontally offers several benefits, including improved readability, easier navigation, enhanced comprehension, and a more professional presentation. It creates a uniform and visually appealing layout that facilitates efficient data analysis and communication.

Question 5: Is there a keyboard shortcut to center worksheets horizontally?

Unfortunately, there is no direct keyboard shortcut to center worksheets horizontally in Excel. You need to use the ‘Alignment’ group options in the ‘Page Layout’ tab to apply the ‘Center’ alignment.

Question 6: Can I center worksheets horizontally in earlier versions of Excel?

In earlier versions of Excel, the process of centering worksheets horizontally may be slightly different. You may need to manually adjust the column widths or use the ‘Format’ menu to access the alignment options. However, the basic principles of centering remain the same.

By understanding these frequently asked questions and their answers, you can effectively center worksheets horizontally in Microsoft Excel, enhancing the readability, organization, and overall presentation of your spreadsheets.

Transition to the next article section:

Tips for Centering Worksheets Horizontally in Excel

Mastering the art of centering worksheets horizontally in Microsoft Excel can significantly enhance the readability, organization, and overall presentation of your spreadsheets. Here are some useful tips to guide you:

Tip 1: Use the Alignment Options

Locate the ‘Alignment’ group in the ‘Page Layout’ tab. The ‘Center’ alignment option allows you to center the content of cells horizontally within the selected range. Simply select the cells or entire worksheet and apply the ‘Center’ alignment to achieve a balanced layout.

Tip 2: Select All Cells

To center the entire worksheet horizontally, select all cells by pressing Ctrl+A on your keyboard. This ensures that all data is evenly distributed across the worksheet, creating a visually appealing and consistent appearance.

Tip 3: Center Specific Cells or Ranges

You can also center only specific cells or ranges horizontally. Select the desired cells or ranges, then apply the ‘Center’ alignment option from the ‘Alignment’ group. This allows you to customize the alignment of particular sections of your worksheet.

Tip 4: Enhance Readability

Centering worksheets horizontally improves readability by ensuring that the content is evenly spaced and visually balanced. It eliminates uneven spacing that can hinder the reader’s ability to scan and comprehend the data efficiently.

Tip 5: Create a Professional Presentation

Centering worksheets horizontally contributes to a professional and polished presentation. It demonstrates attention to detail and adherence to best practices, which is particularly important in business or academic settings where the clarity and organization of data are crucial.

Summary:

By following these tips, you can effectively center worksheets horizontally in Microsoft Excel, resulting in well-organized and visually appealing spreadsheets that are easier to read, navigate, and comprehend. Embrace these techniques to enhance the quality and impact of your Excel spreadsheets.

Conclusion

Centering worksheets horizontally in Microsoft Excel is a valuable technique that enhances the readability, organization, and overall presentation of your spreadsheets. By following the methods outlined in this article, you can effectively align content horizontally, ensuring that data is evenly distributed and visually balanced.

Remember, centering worksheets horizontally creates a professional and polished appearance, making your spreadsheets more effective for communication and analysis. Whether you are working with small or large datasets, taking the time to center your worksheets horizontally will significantly improve their clarity and impact.

Youtube Video:


Images References :

Leave a Comment